
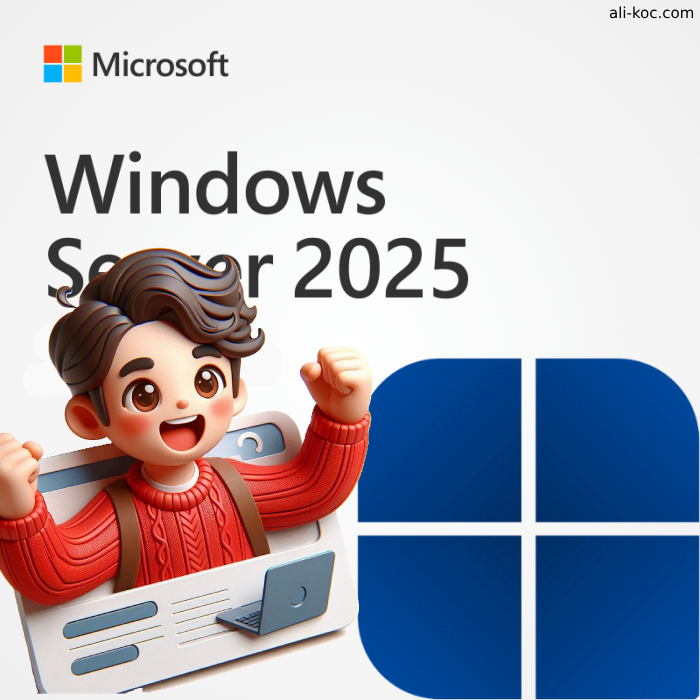
📢📢𝐖𝐢𝐧𝐝𝐨𝐰𝐬 𝐒𝐞𝐫𝐯𝐞𝐫 2025 Genel Kullanıma Sunuldu !
Microsoft, Windows Server 2025’in genel kullanıma sunulduğunu duyurdu.
Yeni sürüm, gelişmiş güvenlik özellikleri, performans iyileştirmeleri ve bulut uyumluluğu gibi yeniliklerle, işletmelere daha güçlü ve esnek bir altyapı sağlıyor.
💡 𝐖𝐢𝐧𝐝𝐨𝐰𝐬 𝐒𝐞𝐫𝐯𝐞𝐫 2025’in öne çıkan özelliklerini incelersek;
✔️ Windows Server 2025, siber güvenliği güçlendiren yeni özellikler sunuyor. Active Directory ve SMB (Server Message Block) protokolü geliştirmeleri sayesinde, kimlik doğrulama ve dosya paylaşımı daha güvenli hale geliyor. Ayrıca dMSA (Distributed Managed Service Account) ile hizmet hesapları daha güvenli bir şekilde yönetiliyor. Bu yeni güvenlik özellikleri, özellikle veri ihlallerine karşı koruma sağlama ve yetkisiz erişim riskini azaltma konusunda öne çıkıyor.
✔️ Yeni Windows Server sürümü, Azure Arc ile entegre çalışan Hotpatching özelliğini içeriyor. Bu özellik, sunucuların yeniden başlatılmasına gerek kalmadan güncellemelerin yapılmasını sağlıyor. SDN (Software-Defined Networking) çoklu site desteği ve merkezi ağ politikası yönetimi ile hibrit bulut ortamlarında yönetim esnekliği sunuluyor. Böylece, kurumlar hem yerel hem de bulut ortamlarını tek bir platformda yönetme avantajına sahip oluyor.
✔️Hyper-V sanallaştırma platformuna gelen GPU desteği ve NVMe (Non-Volatile Memory Express) tabanlı depolama performansındaki %60 artış sayesinde, yapay zeka ve makine öğrenimi uygulamaları için optimize edilmiş bir altyapı sunuluyor. Bu geliştirmeler, özellikle ağır veri işleme ve analitik gerektiren iş yüklerinde performans artışı sağlıyor.
✔️Depolama alanında da önemli yenilikler mevcut. Storage Spaces Direct ve ReFS (Resilient File System) sıkıştırma özellikleri ile verilerin daha verimli depolanması sağlanıyor. Ayrıca, NVMe performansındaki %60’lık iyileştirme, hızlı ve güvenilir bir depolama altyapısı sunarak iş yüklerinin daha verimli yönetilmesine olanak tanıyor.
✔️Windows Server 2025, yönetim süreçlerini kolaylaştırmak ve hızlandırmak amacıyla Windows Admin Center üzerinden güncellemeler getiriyor. Yöneticiler, sunucularını daha hızlı ve güvenilir bir şekilde yönetebilirken, PowerShell ve Azure Arc ile otomasyon seçenekleri, rutin işlemleri daha hızlı gerçekleştirmeye olanak tanıyor.
✔️Yeni sürümde, hibrit bulut desteği ile bulut tabanlı uygulamaları yerel sunucularla daha entegre çalıştırma imkanı sunuluyor. Azure Kubernetes Services (AKS) entegrasyonu, bulut uygulamaları ve konteyner yönetimi için yüksek düzeyde bir ölçeklenebilirlik sağlıyor.
🔥🔥 Windows Server 2025, güçlü güvenlik önlemleri, gelişmiş performans özellikleri ve bulut entegrasyonu ile işletmelere çok yönlü bir çözüm sunuyor. Microsoft’un bu yeni sürümü, kurumların dijital dönüşüm yolculuklarını hızlandırırken, verimlilik ve güvenliği en üst seviyeye çıkarmayı hedefliyor.
Category: Uncategorized
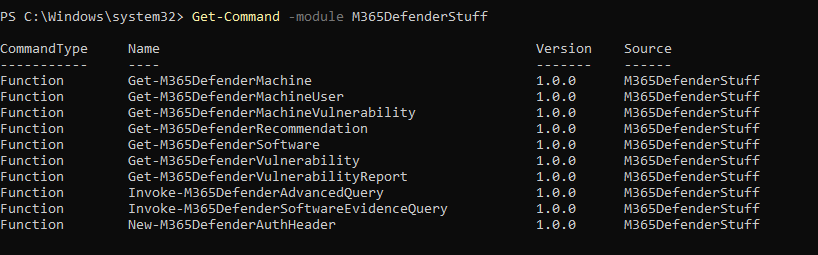
WHAT IS M365DefenderStuff MODULE ?
Microsoft continues to enhance XDR capabilities every day. To use this comprehensive security solution more effectively, the M365DefenderStuff module has been developed, providing IT professionals and security managers with essential capabilities. In this article, we’ll delve into the capabilities, commands, and outputs of the M365DefenderStuff module.

CategoriesUncategorized
Remove Classification footer All Documents with Powershell !
When you need to edit footers in multiple documents, doing it manually can be time-consuming. If you need to remove a specific footer like “Classification” from all documents, automating the process can save you a lot of time. PowerShell is an ideal tool for this task. In this post, we’ll walk you through how to use PowerShell to delete the “Classification” footer from all your documents.
Requirements
- Windows operating system
- PowerShell
- Microsoft Word installed (PowerShell will use COM objects to manipulate Word documents)
Preparing the PowerShell Script
- Setting PowerShell Permissions
First, ensure PowerShell has the necessary permissions to run scripts. Run PowerShell as an administrator and enter the following command:
Set-ExecutionPolicy RemoteSigned
This command allows the execution of signed scripts.
- Writing the PowerShell Script
The following PowerShell script will open all Word documents in a specified folder, remove the “Classification” footer, and save the changes:
# Word dosyalarını işlemek için gerekli modül
Add-Type -AssemblyName Microsoft.Office.Interop.Word
$word = New-Object -ComObject Word.Application
$word.Visible = $false
# Excel dosyalarını işlemek için gerekli modül
Add-Type -AssemblyName Microsoft.Office.Interop.Excel
$excel = New-Object -ComObject Excel.Application
$excel.Visible = $false
# Function to remove footer from Word document
Function Remove-WordFooter($filePath) {
$doc = $word.Documents.Open($filePath)
foreach ($section in $doc.Sections) {
foreach ($headerFooter in $section.Footers) {
$headerFooter.Range.Text = “”
}
}
$doc.Save()
$doc.Close()
}
# Function to remove footer from Excel document
Function Remove-ExcelFooter($filePath) {
$workbook = $excel.Workbooks.Open($filePath)
foreach ($worksheet in $workbook.Worksheets) {
$worksheet.PageSetup.LeftFooter = “”
$worksheet.PageSetup.CenterFooter = “”
$worksheet.PageSetup.RightFooter = “”
}
$workbook.Save()
$workbook.Close()
}
# Function to search and remove footers in a local directory
Function Search-And-Remove-Footers($path) {
$files = Get-ChildItem -Path $path -Recurse -Include *.docx, *.xlsx
foreach ($file in $files) {
try {
if ($file.Extension -eq “.docx”) {
Remove-WordFooter $file.FullName
} elseif ($file.Extension -eq “.xlsx”) {
Remove-ExcelFooter $file.FullName
}
} catch {
Write-Host “Error processing file: $file.FullName”
}
}
}
# Define the path to search
$localPath = “C:\Users\Ali.koc\Desktop\test”
# Search and remove footers for local files
Search-And-Remove-Footers $localPath
# Cleanup
$word.Quit()
$excel.Quit()
Running the Script
- Create the script in a text editor (e.g., Notepad) and save it as
Remove-ClassificationFooter.ps1. - Run PowerShell as an administrator.
- Navigate to the directory where the script is saved and run the script:
.\Remove-ClassificationFooter.ps1
if you want delete the specific footer, you can use script below
# Word uygulamasını başlat ve görünmez yap
$word = New-Object -ComObject Word.Application
$word.Visible = $false
# Belirli bir klasördeki tüm Word belgelerini işle
$folderPath = “C:\desktop”
$files = Get-ChildItem -Path $folderPath -Filter *.docx
foreach ($file in $files) {
Write-Host “Processing file: $($file.FullName)”
try {
# Her belgeyi aç
$document = $word.Documents.Open($file.FullName)
# Belirli bir metni alt bilgilerde ara ve sil
$textFound = $false
foreach ($section in $document.Sections) {
foreach ($footer in $section.Footers) {
$range = $footer.Range
$find = $range.Find
$find.Text = “!!!YOUR KEYWORD!!!”
$find.Replacement.Text = “”
$find.Forward = $true
$find.Wrap = 1 # wdFindContinue
$find.Format = $false
$find.MatchCase = $false
$find.MatchWholeWord = $true
$find.MatchWildcards = $false
$find.MatchSoundsLike = $false
$find.MatchAllWordForms = $false
$result = $find.Execute()
if ($result -eq $true) {
$textFound = $true
$range.Text = $find.Replacement.Text
Write-Host “Text found and replaced in footer of $($file.FullName)”
} else {
Write-Host “Text not found in footer of $($file.FullName)”
}
}
}
if ($textFound) {
# Değişiklikleri kaydet
$document.Save()
}
# Belgeyi kapat
$document.Close()
} catch {
Write-Host “Error processing file: $($file.FullName) – $_”
}
}
# Word uygulamasını kapat
$word.Quit()
# COM nesnelerini serbest bırak
[System.Runtime.InteropServices.Marshal]::ReleaseComObject($word) | Out-Null
Remove-Variable word
[System.GC]::Collect()
[System.GC]::WaitForPendingFinalizers()
Conclusion
This script will automatically remove the “Classification” footer from all Word documents in the specified directory. This solution saves time and reduces the likelihood of errors.
By leveraging the power and flexibility of PowerShell, you can automate your document editing tasks and work more efficiently. Using PowerShell for tasks like this can greatly optimize your workflows.
Enjoy !
Export Admin Activity on Powershell
Monitoring and exporting administrative activities in your Microsoft 365 environment is crucial for maintaining security and compliance. In this article, we will walk you through the process of exporting Microsoft 365 admin activities using PowerShell.
Prerequisites
Before getting started, ensure you meet the following prerequisites:
- Microsoft 365 PowerShell Modules: You need to install the Microsoft 365 PowerShell modules, including
Exchange Online PowerShell V2andMicrosoft 365 Compliance Center. - Authorized User Account: You must have a user account with sufficient permissions to view and export admin activities.
Step 1: Install and Import PowerShell Modules
The first step is to install and import the necessary PowerShell modules. Run the following commands:
Eğer oluşan bu çıktıyı export etmek isterseniz, yine bir export ps1 calıstırmanız gerekmektedir.
# Install the Exchange Online PowerShell V2 module
Install-Module -Name ExchangeOnlineManagement -Scope CurrentUser -Force
# Install the Microsoft 365 Compliance Center module
Install-Module -Name ExchangeOnlineManagement -Scope CurrentUser -Force
# Import the modules
Import-Module ExchangeOnlineManagement
Import-Module Microsoft.Online.SharePoint.PowerShell
Step 2: Connect to Microsoft 365
After installing the modules, connect to your Microsoft 365 environment using the following commands:
# Connect to Exchange Online
$UserCredential = Get-Credential
Connect-ExchangeOnline -Credential $UserCredential
# Connect to Microsoft 365 Compliance Center
Connect-IPPSSession -Credential $UserCredential
Step 3: Query Admin Activities
To query Microsoft 365 admin activities, use the Search-UnifiedAuditLog cmdlet. This cmdlet allows you to search for administrative activities across various Microsoft 365 services and to export the query results to a CSV file, use the Export-Csv cmdlet:
Here is an example query:
# Gerekli parametreleri belirleyin
$StartDate = (Get-Date).AddDays(-30) # Son 30 günü sorgular
$EndDate = Get-Date
$RecordTypes = @(“ExchangeAdmin”, “AzureActiveDirectory”) # Yönetici aktiviteleri
# Her bir RecordType için Audit Log’u sorgulayın ve dışa aktarın
foreach ($RecordType in $RecordTypes) {
$AuditLogs = Search-UnifiedAuditLog -StartDate $StartDate -EndDate $EndDate -RecordType $RecordType -ResultSize 5000
# Sonuçları işleyerek DisplayName’i ekleyin ve dışa aktarın
$AuditLogs | Select-Object -Property CreationDate, UserIds, Operations, AuditData, DisplayName | Export-Csv -Path “C:\AdminActivities_$RecordType.csv” -NoTypeInformation
}
Conclusion
In this article, you learned how to export Microsoft 365 admin activities using PowerShell. By performing this task regularly, you can monitor admin activities and meet your security and compliance requirements.
For more customization or specific activities, refer to the documentation for the Search-UnifiedAuditLog cmdlet.

World Password Day ! – Peki ya Şifrelerimizden Kurtulsak !!
Sektörde 2013 Yılından beri her yıl Mayıs ayının ilk Perşembe günü “World Password Day” olarak bilinmektedir. Şifrelerimizin güvenliğini sağlamak başlı başına bir problem olduğunu hepimiz biliyoruz. Bunun için farklı güvenlik çözümlerine ihtiyaç duyuyoruz. Bununla beraber güvenlik çözümlerinin yanı sıra, personellerimizin farkındalığını arttırmak da başlı başına bir çözüm yöntemi haline gelmiş bulunmakta.
Güvenlik demişken, bir şifre nasıl güvenli olabilir ? Kaç karakterli olmalıdır? Sadece rakamlardan oluşsa veya farklı karakterlerde mi bulunsa ?

CategoriesUncategorized
Lockbit Ransomware Attack
Lockbit Ransomware Attack son günlerde uzun bir aradan sonra tekrar karşımıza çıkıyor ve sistemlerimizi tehdit etmekte.
Bu saldırılarda, saldırganlar güvenlik duvarlarını aşarak veya sistem zafiyetlerini kullanarak içeri sızmakta ve sistemlere erişim sağlar sağlamaz gizlice bekleyerek zaman içinde zarar verici eylemler gerçekleştiriyorlar. Buradaki en büyük sorun, anlık olarak zaafiyet gündeminde sizin bir sorununuz yokmuş gibi görünse de , aslında içeride bekleyen zararlı doğru zaman geldiğinde aksiyon alacaktır.
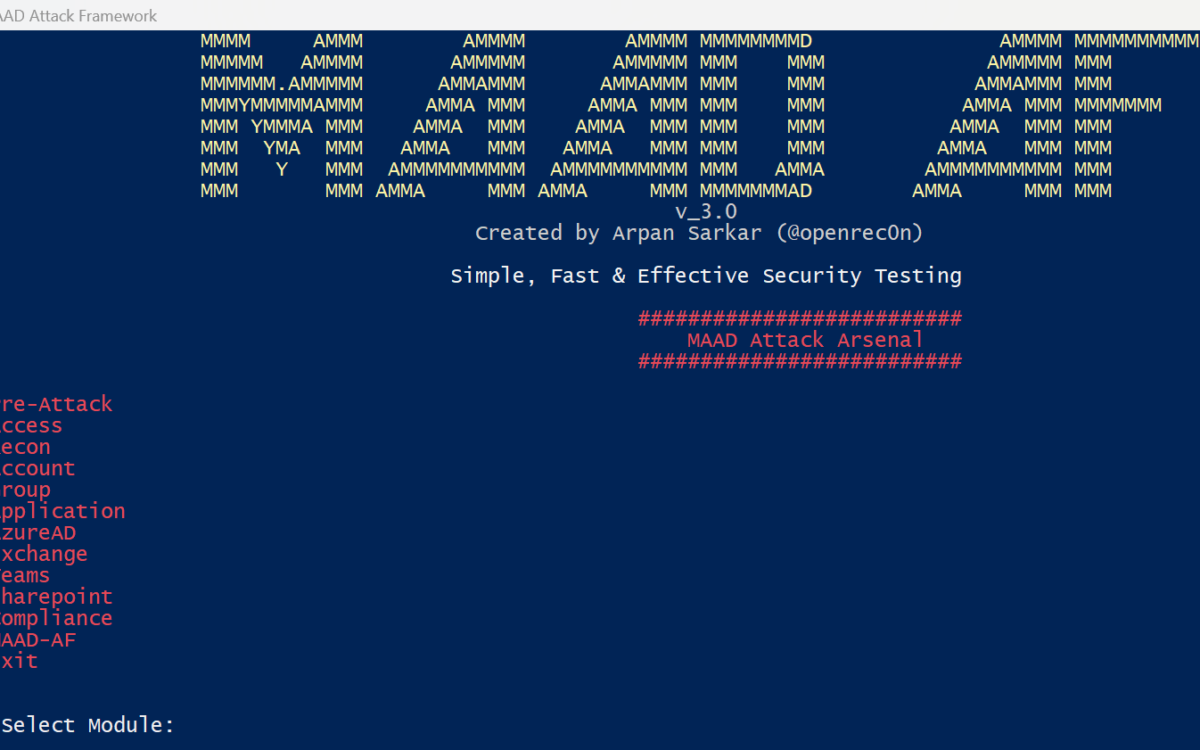
MAAD-AF (Microsoft 365 & Azure AD Attack Framework)
MAAD-AF (Microsoft 365 & Azure AD Attack Framework) Vectra ile , Microsoft 365 ve Azure AD ortamlarının güvenliğini test etmek için geliştirilmiş açık kaynaklı bir bulut saldırı simulation uygulamasıdır. MAAD-AF, sezgisel bir test aracı sağlayarak ve en kritik alanlara odaklanarak güvenlik uygulayıcıları için bulut güvenlik testini basit, hızlı ve etkili hale getirmek üzere tasarlanmıştır.